Contains Amazon affiliate links – I earn a small commission from qualifying purchases, at no extra cost to you.

Author: Holly Dyson

  • When to Prune Hydrangeas: UK Guide

    When to Prune Hydrangeas: UK Guide


    Knowing when to prune hydrangeas matters more than with almost any other shrub, because get the timing wrong on the wrong type and you can cut off an entire year’s flowers before they’ve even had the chance to form. Unlike roses, where most types share a similar pruning window, hydrangeas split into two very different camps — and mixing them up is the single most common reason a hydrangea “never flowers.”

    The Short Answer

    Most popular hydrangeas — mophead and lacecap — are pruned in early spring (March), not autumn or winter. A smaller group — paniculata and smooth hydrangeas — are pruned in late winter (February to early March), and can take a much harder cut.

    The one thing almost every hydrangea has in common: don’t prune in autumn or winter, even though it might feel like the natural time to tidy up.

    Why Timing Matters So Much

    Hydrangeas fall into two groups based on where they form their flower buds:

    • Old wood flowerers (mophead, lacecap, oakleaf, climbing hydrangea) set next year’s flower buds in late summer, on the current season’s stems. Prune these in autumn or winter and you cut off the very buds that were about to become next year’s flowers.
    • New wood flowerers (paniculata, smooth/annabelle types) flower on growth made that same spring. These can be pruned hard in late winter without losing flowers, because the flowering stems haven’t grown yet.

    If you don’t know which type you have, the safest assumption is old wood — most garden hydrangeas sold in the UK are mopheads or lacecaps.

    When to Prune, By Hydrangea Type
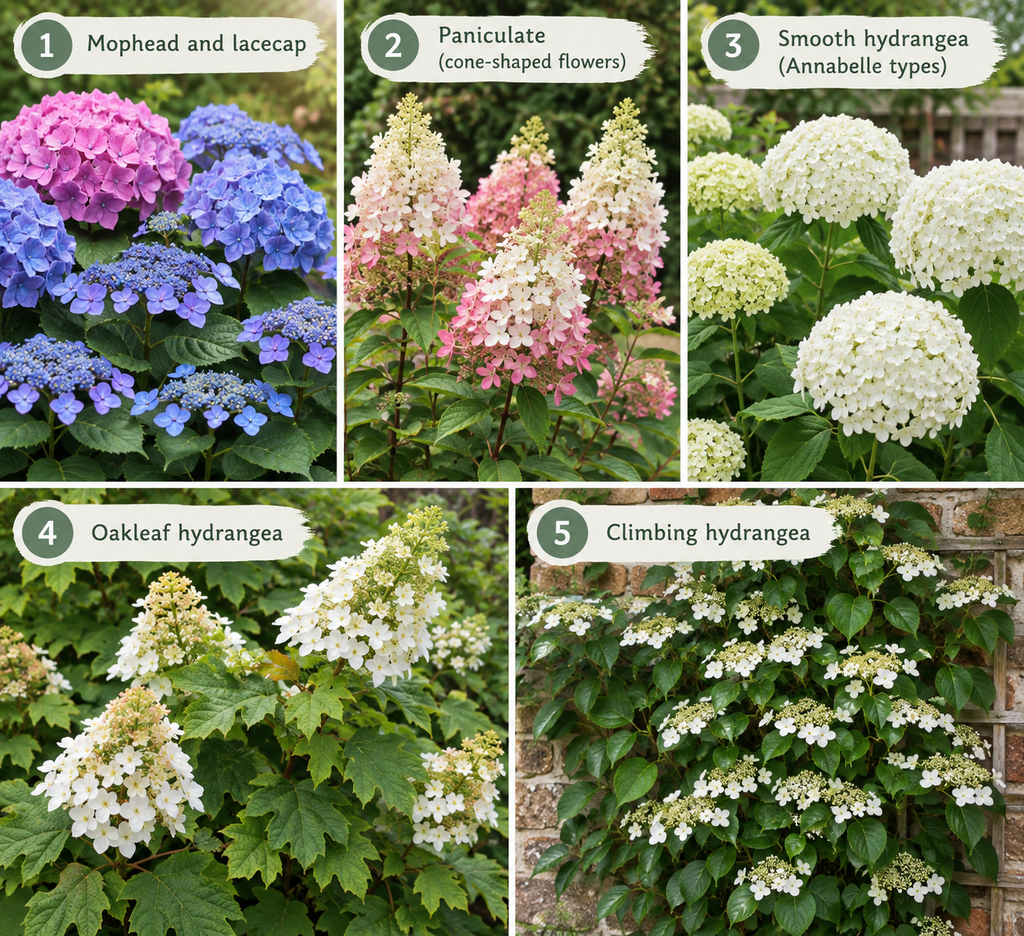
    Five types of UK hydrangea: mophead, paniculata, smooth, oakleaf and climbing

    Mophead and lacecap hydrangeas (most common) (1) Prune in March, once you can see new leaf buds forming. Remove old flower heads (leave them over winter — they protect the buds beneath from frost), cut back to the first strong pair of buds below the old flower head, and remove one or two of the oldest stems at the base each year to keep the plant renewing itself.

    Paniculata hydrangeas (cone-shaped flowers) (2) Prune in February to early March, before new growth starts. These can take a hard prune — cut back to a low framework of stems, around 30–60cm from the ground. The harder you prune, the fewer but larger the flower heads will be.

    Smooth hydrangeas (Annabelle types)(3) Similar to paniculata — prune hard in late winter, cutting close to the ground if you want large, dramatic flower heads, or leave a taller framework for a more natural look.

    Oakleaf hydrangeas (4) Treat like mophead — old wood flowerer, so prune lightly in spring if needed, removing only dead or crossing stems. They don’t need much pruning at all.

    Climbing hydrangeas (5)Rarely need pruning. If needed, do it right after flowering in summer, and only to control size or remove dead growth.

    What You Can (and Can’t) Do Right Now

    If you’re looking at your hydrangeas now, wondering whether to get ahead of the job:

    You can:

    • Deadhead if you want a tidier look, but leave some flower heads on for winter frost protection if you’re in a colder or exposed spot
    • Remove any clearly dead or diseased stems
    • Tidy fallen leaves around the base to reduce fungal disease risk

    Avoid:

    • Any real pruning of mophead, lacecap, oakleaf, or climbing types now — this is exactly the mistake that costs people a year of flowers
    • Cutting back paniculata or smooth types now either — while they’re more forgiving on timing than mopheads, there’s no benefit to pruning before late winter, and you risk frost damage to any new cuts

    Common Mistakes

    • Pruning mopheads/lacecaps in autumn or winter — by far the most common reason a hydrangea suddenly stops flowering
    • Removing spent flower heads too early — they protect next year’s buds from frost over winter
    • Treating every hydrangea the same — a paniculata and a mophead need almost opposite approaches
    • Not knowing which type you have — worth checking a plant label or asking before you cut, since guessing wrong costs a whole season

    Recommended Gear for Hydrangea Pruning

    1. Bypass Secateurs

    Clean cuts on healthy stems reduce disease risk — the same tool you’d use for roses.

    Check Price on Amazon →

    2. Garden Gloves

    Not thorny like roses, but gloves protect against sap and rough older bark.

    Check Price on Amazon →

    3. Plant Labels

    Small but useful — knowing your exact hydrangea type is half the battle with pruning timing.

    Check Price on Amazon →

    Quick Recap

    • Mophead, lacecap, oakleaf, climbing: prune in March, lightly
    • Paniculata, smooth (Annabelle): prune in February–March, can go hard
    • Never prune any type in autumn or winter
    • If unsure of your type, treat it as old wood and wait until spring

    Related Reading

    If you’re planning other autumn and winter garden jobs, these might help too:
  • When to Prune Roses: UK Guide

    When to Prune Roses: UK Guide


    Knowing when to prune roses is the difference between a rose bush that rewards you with flowers all summer, and one that sulks for a year because you cut at the wrong time. Get it wrong and you’ll either lose next year’s blooms entirely, or expose soft new growth to a frost that kills it stone dead.

    The good news is that once you know which type of rose you’re dealing with, the timing is straightforward.

    The Short Answer

    Most roses are pruned in late winter to early spring — February in the south of the UK, March further north — just as the buds start to swell but before leaves properly appear.

    There’s one major exception: rambling roses, which are pruned in late summer, straight after flowering (usually August or September).

    When to Prune, By Rose Type

    Bush roses (hybrid tea and floribunda) Hard prune in late winter. Cut back to 3–5 strong, outward-facing stems, around 20–30cm from the ground. February works in the south; wait until March if you’re further north or somewhere exposed.

    Shrub roses and English roses Similar timing to bush roses — late winter, but with a lighter touch. These don’t need cutting back as hard; just remove dead, damaged or crossing stems and lightly shape.

    Climbing roses Prune in late autumn to early winter (November to December), once flowering has finished. Tie in the main framework, then shorten side shoots that flowered back to 2–3 buds.

    Rambling roses This is the one to get right. Ramblers flower once, in a rush, on stems they grew the previous year. Prune them in winter and you’ll cut off the very stems that were about to flower for you — resulting in a rose that grows beautifully but never blooms. Instead, prune ramblers straight after flowering, in late summer/early autumn. Cut the stems that have just flowered right down, and tie in the new green growth that will flower next year.

    Regional Timing Differences

    The UK’s climate varies enough that “late winter” means different things depending on where you garden:

    • South of England: mid-February
    • Midlands: late February to early March
    • Northern England and Scotland: mid-to-late March, sometimes into April in colder or exposed spots

    The real signal to watch for isn’t the calendar — it’s the buds. Wait until they start to swell, and hold off if a hard frost is forecast, regardless of what month it is.

    What You Can (and Can’t) Do Right Now

    If you’re reading this in autumn wondering whether you can get ahead of the job, here’s where things stand:

    You can:

    • Remove any dead, diseased or damaged stems — this is fine any time of year
    • Give tall bush roses a light trim to reduce “wind rock” over winter (shortening by around a third stops the roots being loosened by winter gales)
    • Prune ramblers, if that’s what you’re growing and they’ve just finished flowering

    Avoid:

    • Hard pruning bush, shrub or climbing roses now — a mild autumn spell can trigger new growth that the next frost will kill
    • Pruning anything you’re not sure of the type of — if in doubt, wait until you can see what you’re dealing with once the leaves drop.

    Common Mistakes

    • Pruning ramblers in winter — the single most common reason a healthy rambling rose refuses to flower
    • Pruning too early after a mild spell — new growth gets caught by a later frost
    • Treating every rose the same — a rose that flowers all summer (most modern varieties) can take a hard winter prune; one that flowers once, on old wood, can’t.

    If your roses looked stressed after this summer’s heat, its worth checking whether they are dormant or in real trouble before you prune.

    Recommended Gear for Rose Pruning

    1. Bypass Secateurs

    For clean cuts on healthy stems — a sharp, clean cut heals faster and reduces disease risk.

    Check Price on Amazon →

    2. Loppers

    For thicker, older woody stems that secateurs won’t get through cleanly.

    Check Price on Amazon →

    3. Thorn-Proof Gardening Gloves

    Roses don’t forgive bare hands — proper gauntlet-style gloves protect wrists and forearms too.

    Check Price on Amazon →

    Quick Recap

    • Most roses: late winter, Feb (south) to March (north)
    • Ramblers: late summer, straight after flowering — the exception to remember
    • Right now: light tidying only, save the hard pruning for late winter
    • Always cut to an outward-facing bud, about 5mm above it
  • How Long Does It Take a Lawn to Recover From a Dry Summer?

    How Long Does It Take a Lawn to Recover From a Dry Summer?

    If you’re staring at a brown, crunchy lawn wondering about lawn recovery time after a dry summer, the honest answer is: it depends, but usually less time than you’d think. Most UK lawns bounce back within a few weeks of consistent rain or watering, though full recovery to a thick, healthy sward can take longer. Here’s a realistic timeline, and what actually speeds it up.

    QUICK LAWN RECOVERY LIST

    The first sign of recovery: 7-14 days

    Once decent rainfall returns (or you’re watering consistently), most dormant grass starts showing green shoots within one to two weeks. This is the grass breaking dormancy, not full recovery — you’ll see thin streaks of green appearing through the brown, usually starting in shadier or slightly damper patches first.

    If you see zero green after two to three weeks of consistent moisture, that’s a sign some areas may have genuinely died rather than gone dormant, and those patches will need reseeding rather than just waiting.

    Visible green cover: 3-4 weeks

    By three to four weeks after rain returns, most lawns show clear, patchy green growth across the majority of the area. It won’t look thick or even yet, but the “is this lawn dead” question is usually answered by this point — if you’re seeing meaningful green, the lawn is recovering, not gone.

    A lawn that looks normal again: 6-8 weeks

    This is typically when a recovering lawn starts to look properly green and reasonably even again, assuming consistent moisture throughout. Mowing can usually resume around this point too, once grass has reached 5-7cm, with the blade set high for the first few cuts to avoid stressing regrowth.

    Full density and strength: into next spring

    Here’s the part that surprises people: even once a lawn looks fully recovered, the root system underneath often hasn’t caught up. A lawn that was drought-stressed this summer typically doesn’t reach full root depth and density again until well into the following spring, after a proper winter of undisturbed growth. This is exactly why autumn feeding, aeration, and any reseeding matter so much — they’re setting up next year’s resilience, not just fixing this year’s appearance.

    What speeds recovery up

    Consistent, not occasional, moisture

    Grass recovers faster with steady, moderate watering than with infrequent heavy soaking. If you’re not relying on rainfall alone, a light daily watering with a watering can over the first couple of weeks does more for recovery than one big soak followed by nothing.

    Aeration on compacted soil

    If your lawn sees regular foot traffic, compacted soil can slow recovery significantly, since water and air struggle to reach the roots. Aerating with a garden fork, pushed in every 10-15cm and gently rocked, opens up the soil and speeds up how quickly moisture reaches the root zone.

    Avoiding traffic on recovering grass

    As tempting as it is, keeping foot traffic off a recovering lawn for the first few weeks makes a real difference. Stressed grass has far less resilience than healthy grass, and repeated walking on it while it’s trying to recover can set growth back noticeably.

    Not over-fertilising too early

    It’s tempting to reach for fertiliser the moment green appears, but feeding too early — before the root system has caught up with the visible growth — can push soft top growth the roots aren’t ready to support. Wait until the lawn has genuinely established some green cover before feeding, then use a slow-release granular feed rather than a fast-acting one.

    When to reseed instead of waiting

    If, after three to four weeks of consistent moisture, certain patches show no green at all while the rest of the lawn is clearly recovering, those specific areas have likely died rather than gone dormant. Rather than waiting indefinitely, it’s usually more effective to reseed those patches directly. See our guide on the best time to reseed a lawn after a dry summer for how to time and prepare that properly.

    The bottom line

    Whatever your lawn’s recovery time after a dry summer turns out to be, most UK lawns show the first signs of recovery within two weeks of consistent moisture, look genuinely green again within a month, and feel properly back to normal within six to eight weeks — but the deeper root recovery that makes a lawn truly resilient continues well into the following spring. Patience, consistent watering, and avoiding the temptation to rush fertiliser or mowing all help the process along.

  • Best Time to Reseed a Lawn After a Dry Summer

    Best Time to Reseed a Lawn After a Dry Summer

    If you are trying to work out how to reseed a lawn after a dry summer, timing is everything. If your lawn came out of this summer patchy, thin, or bald in places, you’re probably wondering when it’s actually safe to reseed. Get the timing right and new grass establishes quickly with minimal fuss. Get it wrong — too early, too late, or into soil that isn’t ready — and you can end up throwing seed down twice. Here’s the best time to reseed a lawn after a dry summer, and how to give it the best possible start.

    Why timing matters more than you’d think

    Grass seed needs three things to germinate reliably: warm soil, consistent moisture, and enough time to establish roots before winter dormancy sets in. Straight after a dry summer, the soil is often still warm, but bone dry — sowing seed into parched ground wastes it, since without moisture it simply won’t germinate. Wait too long into autumn, though, and falling soil temperatures slow germination right down, leaving young grass without enough time to root properly before growth stops for winter.

    The window that actually works

    September through mid-October is the sweet spot for most of the UK. By this point, the worst of summer’s heat has usually passed, autumn rain has started returning moisture to the soil, but there’s still enough warmth left in the ground to get seed germinating within one to two weeks.

    If you’re reading this in early September, you’re in a good position. If it’s already October, don’t panic — seed can still go down, but the later you leave it, the more you’re relying on a mild autumn to get proper establishment before the cold sets in.

    How to tell if your soil is actually ready

    Don’t reseed purely by date — check the ground itself. Push a garden fork into the soil in a few different spots around the lawn. If it goes in relatively easily and the soil feels slightly moist rather than dust-dry or waterlogged, you’re in a good window. If the ground is still rock hard from summer, hold off and water it (or wait for a good spell of rain) before sowing.

    Preparing the lawn before you sow

    Scarify first

    Rake out dead grass, thatch, and moss before sowing. New seed needs direct contact with soil to germinate — sowing on top of a thatchy, matted lawn wastes most of it, since the seed never reaches the ground.

    Overseed bald patches specifically

    Rather than blanket-sowing the whole lawn, focus seed where it’s actually needed. Loosen the soil surface in bald or thin patches with a rake or garden fork, then work the seed in lightly so it makes contact with soil rather than sitting exposed on top.

    Choose the right seed for next summer, not just this autumn

    If this summer exposed weak spots in your lawn, it’s worth reseeding with a drought-tolerant grass seed blend rather than replacing like-for-like. See our guide to the best drought-tolerant grass seed for UK lawns for options that cope better with next year’s dry spells.

    Watering new seed without waste

    New grass seed needs consistently moist (not waterlogged) soil for the first couple of weeks while it germinates. A light daily watering with a watering can is usually more effective than one heavy soak, since it keeps the surface moist without washing seed away or over saturating the ground. If a hosepipe ban is still in place in your area, this is exactly the kind of light, targeted watering that’s typically still permitted, since it uses far less water than a sprinkler or hose.

    What to expect and when

    Most grass seed germinates within 7-21 days depending on variety, soil temperature, and weather. You’ll likely see the first fine green shoots within two weeks if conditions are right. Avoid walking on the new grass or mowing until it’s reached at least 5-7cm and had its first proper cut with blades set high, usually 4-6 weeks after sowing.

    The bottom line

    Reseeding after a dry summer isn’t complicated, but it does reward getting the timing and soil preparation right. Aim for September to mid-October, check your soil is actually ready rather than just going by the calendar, and focus your effort on thin or bald patches rather than the whole lawn. Do that, and you’ll have a genuinely stronger lawn heading into next summer — not just a patched-up version of this year’s.

  • Second Summer Drought in a Row: What to Change for Next Year

    Second Summer Drought in a Row: What to Change for Next Year

    If you’re dealing with a garden after drought UK weather has hit twice in a row, you’re not imagining it — this is officially the second consecutive summer drought. For the second year running, large parts of England spent the summer in official drought, with hosepipe bans covering millions of households and reservoirs left well below where they should be. One dry summer can be written off as bad luck. Two in a row is a pattern — and it’s worth actually planning around, rather than hoping next year is different.

    Why this matters more than it did last year

    A single dry summer stresses a garden. A second one, arriving before plants have fully recovered from the first, tends to hit harder. Root systems that were already shallow or damaged don’t get the recovery window they need, soil that was already depleted goes into the next dry spell with even less reserve moisture, and plants that limped through year one are often the first to fail in year two.

    If your garden felt like it struggled more this year than last, that’s not necessarily anything you did wrong — it’s often simply the compounding effect of back-to-back dry seasons on a garden that hasn’t had a proper wet year to reset.

    What’s actually worth changing for next year

    Stop treating drought-tolerant planting as optional

    If you’ve been meaning to swap out thirsty, high-maintenance plants for drought-tolerant alternatives but kept putting it off, two dry summers in a row is a reasonable point to stop waiting. This doesn’t mean ripping out an entire border — it means treating any plant that failed or badly struggled this year as a signal, not a one-off, and replacing it with something built for these conditions when autumn planting season arrives.

    Get water storage in place before you need it

    If you didn’t have a water butt (or enough capacity) this year, that’s the single most practical fix to make before next summer. A water butt paired with a diverter kit makes it easy to start collecting rainwater from your down pipe without major plumbing. Rainwater harvested through autumn and winter is exactly what gets a garden through a hosepipe ban without relying on hand-carried tap water. It’s far easier to set this up now, while there’s no pressure, than to be shopping for one mid-heatwave when demand — and prices — spike. Further information is in our water butt buying guide.

    Rethink lawn expectations, not just lawn care

    If your lawn has now gone through the brown-recover-brown cycle twice, it might be worth asking whether a smaller lawn, or partial replacement with gravel or drought-tolerant ground cover in the driest, sunniest areas, makes more sense than fighting the same battle every summer. A lawn doesn’t have to be all-or-nothing — even converting the worst-affected section can reduce how much of the garden needs saving each time drought hits.

    Prioritise soil health over quick fixes

    Two dry summers in a row deplete soil organic matter faster than one. Adding compost or well-rotted mulch this autumn does more for next year’s drought resilience than almost anything else, since healthier soil holds water far more effectively than depleted soil, regardless of what’s planted in it.

    Plan irrigation, not just watering

    If you were hand-watering with a can all summer, it’s worth considering whether a simple drip irrigation system, timer, or even just a smarter watering routine would use the water you do have more efficiently. This matters more now than it did after a single dry summer, since relying on the same reactive approach for a third consecutive year is a real possibility, not a hypothetical.

    The bigger picture

    None of this guarantees next summer will be easier — nobody can promise that. But a garden that’s been deliberately adjusted after two dry summers in a row is in a genuinely different position than one that’s just hoping for better luck. The changes that matter most are the ones made now, in autumn, while there’s time to plant properly, build up soil, and get water storage sorted before the pressure’s back on.

    If this summer taught you anything about your garden’s weak points, autumn is the season to actually act on it.

  • What Worked This Summer: Lawn Lessons from a UK Heatwave

    What Worked This Summer: Lawn Lessons from a UK Heatwave

    After a summer that tested every lawn in the country, here are the lawn care tips UK summer gardeners actually found useful this year – no theory, just what worked.

    Every scorching summer teaches you something new about your garden, whether you asked for the lesson or not. After a season of heat, hosepipe bans, and a lawn that spent most of July looking distinctly unimpressed, here’s what actually made a difference this year — and what’s going straight into next year’s plan too.

    Leave the grass longer

    The single easiest change that helped: raising the mower height and simply not cutting the lawn as short. Longer grass shades its own roots and soil, holding onto moisture far better than a lawn scalped down to the bone. If you only make one change based on this article, make it this one.

    Feed it right — and choose granular over quick-release

    Nitrogen-based fertiliser kept the lawn ticking over through the stress of summer, but the real lesson was in which type to use. Granular fertiliser won out over other options specifically because of its slow-release properties — rather than a quick burst that the grass can’t fully use (or that washes away before it does much good), granular feed breaks down gradually, giving the lawn a steadier supply exactly when it needs it most.

    Scarify early

    Getting scarifying done early in the season — before the worst of the heat set in — made a noticeable difference. It clears out the thatch and moss that would otherwise compete with the grass for water and nutrients, giving the lawn a cleaner start before the dry months arrive.

    Don’t mow too low

    A close cousin of “leave the grass longer,” but worth its own mention: consistently avoiding a low mow height through the season meant the lawn had more leaf surface to work with, and more shade protecting its own roots.

    A genuinely useful bit of kit: the step-on weed tool

    If there’s one tool that’s earned its place in the shed this year, it’s a long-handled, step-on weed puller — the kind you push into the ground with your foot to pull dandelions and other weeds out from the base, roots and all. It’s a satisfyingly efficient way to deal with weeds without bending down every two minutes, and it gets the whole root out rather than just snapping off the top.

    The trick that makes it even better: carry a small tub of topsoil mixed with grass seed in your pocket as you go. Every time you pull a weed, you’re left with a small bare patch — fill it straight away with a pinch of the soil-and-seed mix, and you’re overseeding as you weed, with almost no extra effort.

    What’s changing for next summer

    Mostly, more of the same — the routine above worked, so it’s staying. But there’s one addition already planned: setting up a proper rainwater harvesting system, so watering doesn’t have to stop the moment a hosepipe ban comes in. A lawn under drought stress still needs water somewhere, and relying on mains supply alone isn’t realistic once restrictions hit. Catching and storing rainwater in advance means there’s something to fall back on exactly when it’s needed most — check out our water butt buying guide for tips on getting started.

    What Actually Helped This Summer

    1. Step-On Weed Puller

    The tool that earned its place in the shed this year — pulls weeds root and all, no bending down.

    Check Price on Amazon →

    2. Granular Lawn Fertiliser

    The slow-release feed that kept our lawn ticking over through the worst of the summer stress.

    Check Price on Amazon →

    3. Self-Propelled Petrol Mower (medium-large gardens)

    Raising the cutting height was the single biggest change that helped. For a bigger lawn, this one has 6 adjustable heights and a wide 46cm deck to make it easy — it’s a bigger spend, but the electric start and larger grass box are worth it if you’re mowing a decent-sized plot regularly.

    Check Price on Amazon →

    4. Corded Electric Mower (smaller gardens)

    If your lawn’s on the smaller side, a lighter corded mower with adjustable heights does the same job for a lot less outlay.

    Check Price on Amazon →

    The bottom line

    None of this is complicated — longer grass, the right fertiliser, early scarifying, and a decent weeding tool did more for this lawn than anything else this summer. Simple, consistent habits beat any single miracle fix, and next year’s plan is really just this year’s, with a rainwater system added in for when the taps get restricted.

  • Best Time to Plant for Drought Resilience: Why Autumn Beats Spring

    Best Time to Plant for Drought Resilience: Why Autumn Beats Spring

    If you’re planning to fill gaps left by this summer’s heat, or finally add the drought-tolerant plants you’ve been meaning to get in the ground, autumn — not spring — is genuinely the better window. It feels counterintuitive to plant right as the weather turns colder, but for building the kind of deep, resilient root systems that cope with next summer’s dry spells, timing now matters more than almost anything else you’ll do.

    Why autumn planting builds more resilient plants

    The case for autumn planting comes down to root establishment, not top growth. When you plant in spring, a young plant has to cope with establishing roots and surviving its first summer’s heat and dryness at the same time — often before it’s had a chance to develop the deeper root system that makes drought tolerance possible in the first place. Plant in autumn instead, and the roots get several months of mild, moist conditions to establish before they’re ever tested by drought.

    Soil temperature plays a big part too. UK soil in September and October is still warm from summer, which encourages active root growth, while air temperatures are cooling — exactly the conditions that favour roots over top growth. By the time next summer arrives, an autumn-planted specimen typically has a root system many months more developed than the same plant put in the ground in spring.

    Rainfall reliability matters as well. Autumn generally brings more consistent rain than late spring or early summer, meaning far less supplementary watering is needed to get a new plant established — which matters both for your own effort and for the plant’s ability to develop deep roots naturally, rather than relying on you topping up the surface constantly.

    The window that actually matters

    Broadly, September through to mid-October is the sweet spot for most UK gardens. Soil is still warm enough to encourage root growth, but there’s enough of the autumn and winter ahead for roots to establish properly before next summer’s demands arrive. Planting much later than this — into November and beyond — still works for many hardy plants, but the closer you get to the first proper frosts, the less time roots have to get going before growth slows right down for winter.

    If you miss the autumn window entirely, spring planting is still workable — it’s simply a harder start for the plant, and you’ll likely need to be more attentive with watering through its first summer to make up for the shorter root-establishment period.

    What to plant now for next summer’s resilience

    A number of proven drought-tolerant choices are particularly well suited to going in now, while conditions favour strong root establishment:

    Lavender (Lavandula angustifolia) — English lavender specifically copes well with an autumn start, provided drainage is sorted before planting. Avoid planting into waterlogged clay without amending it first; see our guide on Mediterranean Planting for UK Gardens With Heavy Clay Soil for how to prepare the ground properly.

    Rosemary — A reliable choice for autumn planting, particularly upright varieties, and one of the more forgiving drought-tolerant shrubs if conditions aren’t perfect.

    Sedum — Established sedum plugs or pots go in easily in autumn and need very little attention once planted, since their thick, water-storing leaves cope well even before a full root system develops.

    Ornamental grasses (Stipa tenuissima and similar) — Grasses generally establish well in autumn, using the cooler months to develop root systems before putting on visible top growth the following spring and summer.

    Santolina and Phlomis — Both cope well with an autumn start and, once established, need minimal water through subsequent summers.

    Achillea (Yarrow) — A strong autumn-planting choice, particularly if you improve drainage in poor or heavy soil beforehand, since Achillea dislikes sitting in wet conditions more than it dislikes dry ones.

    For a fuller list of drought-tolerant options and what makes a plant genuinely suited to UK conditions, see our complete guide to drought-tolerant plants for UK gardens.

    How to plant for the best possible start

    Improve drainage before you plant, not after. This matters even more with autumn planting, since new roots will be sitting through a wet winter almost immediately. Dig horticultural grit into the planting hole and surrounding soil generously, particularly on heavier clay soils.

    Water in thoroughly at planting, then let rain take over
    Even though roots establish more easily in autumn, a new plant still needs a thorough initial watering to settle the soil around the roots and remove air pockets. After that, UK autumn rainfall usually does most of the ongoing work for you.

    Mulch after planting
    A generous layer of mulch around (not touching) the base helps retain soil warmth a little longer into autumn, suppresses weeds competing for the same resources, and protects the soil surface through winter.

    Don’t feed newly planted specimens
    As with any stressed or establishing plant, feeding encourages soft, vulnerable growth at exactly the wrong time. Let the plant focus its energy on root establishment through autumn and winter rather than pushing out new growth it isn’t ready to support.

    The bottom line

    If this summer left you with gaps to fill or a wish list of drought-tolerant plants you didn’t get round to, don’t wait for spring. Planting now, while the soil is still warm and autumn rain is on its way, gives roots months of head start over a spring-planted equivalent — and that head start is often the real difference between a plant that sails through next summer and one that struggles from day one.

  • Mediterranean Planting for UK Gardens With Heavy Clay Soil

    Mediterranean Planting for UK Gardens With Heavy Clay Soil

    Mediterranean-style planting is one of the most popular responses to hotter, drier UK summers — but there’s a catch most guides skip over: many classic Mediterranean plants actively hate the heavy clay soil common across large parts of the UK. Here’s how to get the look and the drought resilience without losing plants to a wet winter.

    Why clay soil and Mediterranean plants often clash

    Mediterranean plants evolved in free-draining, often stony or sandy soil, in a climate with hot dry summers and mild, relatively dry winters. UK clay soil is almost the opposite in winter: it holds water, drains slowly, and can stay cold and waterlogged for weeks at a time. Many Mediterranean plants — lavender, rosemary, cistus among them — cope perfectly well with summer drought, but succumb to root rot over a wet winter in poorly draining clay, not the dry heat they’re often chosen for.

    This is why some gardeners plant a beautiful Mediterranean border, watch it sail through summer, then lose half of it by the following spring — the problem was never drought tolerance, it was winter drainage.

    The real fix: improve drainage before you plant

    Rather than avoiding Mediterranean planting on clay entirely, the more reliable approach is improving the soil’s drainage in the specific areas you’re planting into.

    • Dig in horticultural grit or coarse sand generously into the planting hole and surrounding area — this is the single most effective change for individual plants
    • Raise the bed slightly if planting a whole border, even by just 10–15cm, since a raised profile drains considerably better than flat, low-lying clay
    • Avoid double-digging or breaking up a large area of clay all at once — improving drainage plant-by-plant in individual holes is usually more practical and effective than trying to transform an entire bed’s soil structure
    • Add grit as a mulch layer on the surface too, not just underground — this keeps the crown of the plant (where stem meets soil) drier, which is often the most vulnerable point for rot

    Plant choices that genuinely cope with UK clay

    Some Mediterranean-style plants tolerate clay far better than others once drainage around the root zone is improved:

    Better choices for clay

    • Rosemary (particularly upright varieties) copes reasonably well once drainage is improved at planting
    • English lavender (Lavandula angustifolia) is more clay-tolerant than French or Spanish lavender varieties
    • Euphorbia (many varieties) genuinely tolerates heavier soil better than most Mediterranean-look plants
    • Phlomis copes well with clay once established and adds good structural, silvery foliage
    • Santolina (cotton lavender) is more forgiving of heavier soil than many similar grey-leaved plants

    Trickier on clay, even with improved drainage

    • Cistus (rock rose) is genuinely prone to winter losses on clay, even with grit added
    • Certain lavender varieties (French, Spanish) are noticeably less clay-tolerant than English lavender
    • Some artemisia varieties can struggle through a wet, cold winter regardless of summer drought tolerance

    If you’re drawn to the trickier plants specifically, growing them in raised beds, large containers, or a dedicated gravel garden area see our gravel garden guide sidesteps the clay problem entirely, since you control the growing medium directly.

    For a fuller range of options, see our guide to the best drought-tolerant plants for UK gardens.

    Getting the Mediterranean look without fighting your soil

    • Lean on silver and grey foliage for that sun-baked, Mediterranean feel — santolina, phlomis, and euphorbia all deliver this without the drainage headaches of trickier plants
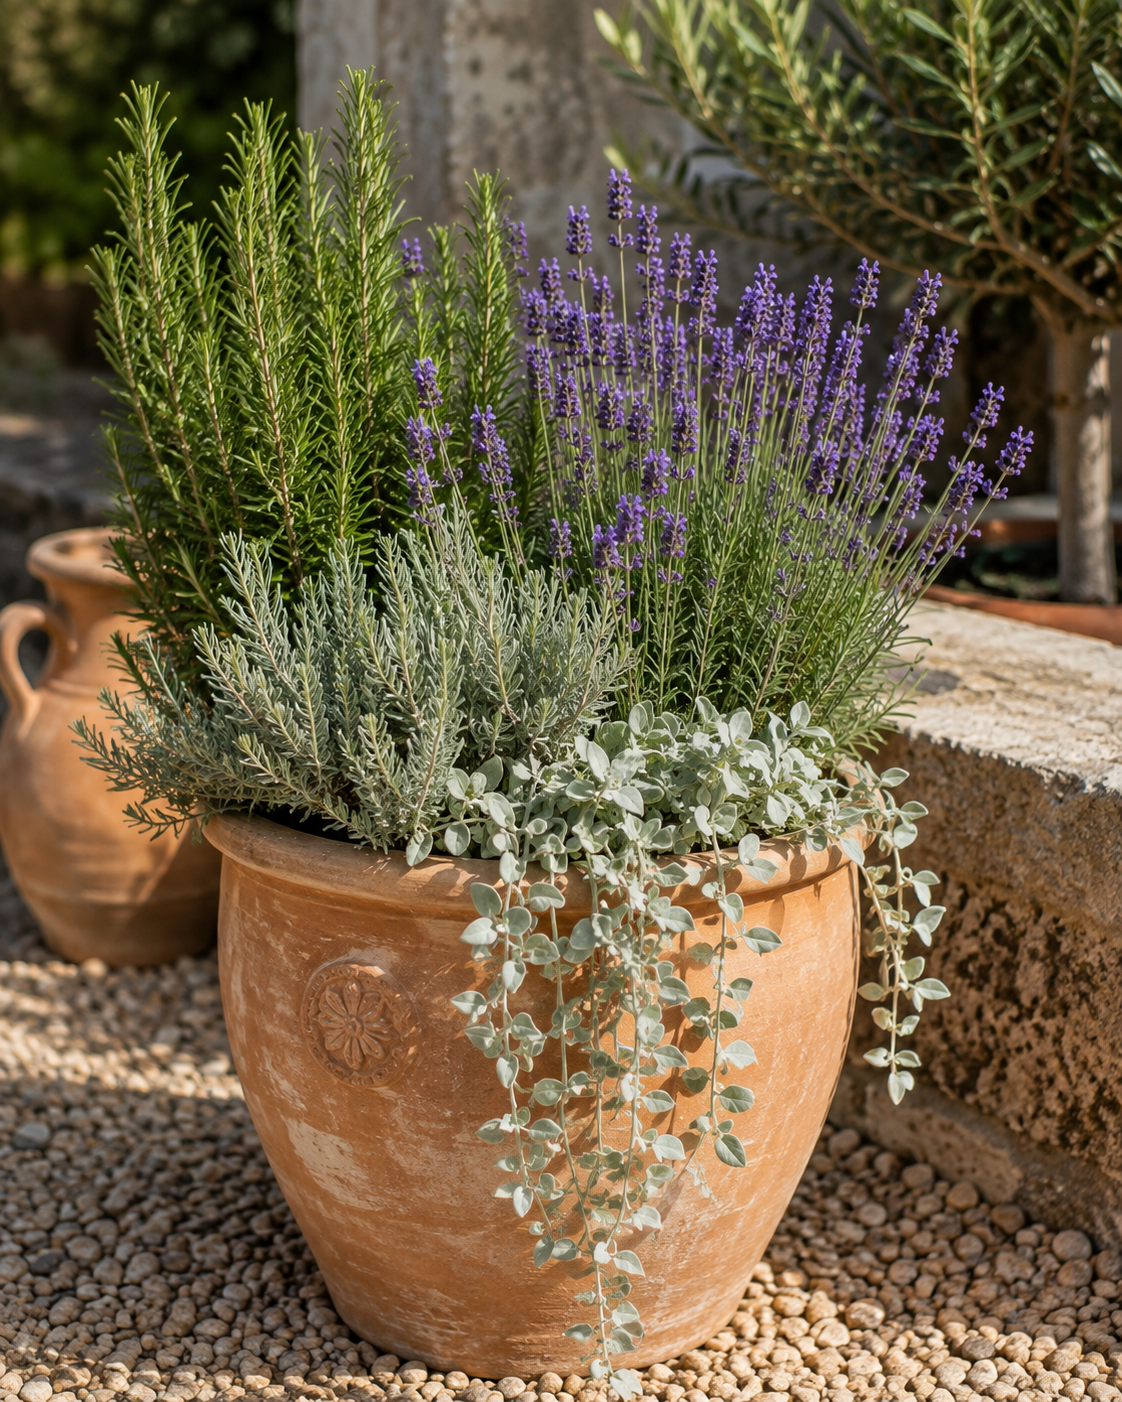
    • Use terracotta pots and gravel mulch as hard landscaping elements, which read as “Mediterranean” visually regardless of what’s growing in the ground beneath
    • Group true Mediterranean natives together in the best-draining spot in the garden (often a raised bed, slope, or gravel area), rather than scattering them through borders with unimproved clay
    • Save clay-tolerant choices for the rest of the border, so the whole space still copes with a typical UK winter even if it doesn’t achieve total plant-for-plant Mediterranean authenticity

    The bottom line

    A convincing Mediterranean-style garden is absolutely achievable on UK clay soil — it just requires treating winter drainage as seriously as summer drought tolerance. Improve drainage where it matters most, choose the more clay-forgiving plants for open borders, and reserve the trickier classics for pots, raised beds, or a dedicated gravel area where you control the conditions directly.

  • Gravel Garden Ideas: Cost, Planning, and How to Get Started

    Gravel Garden Ideas: Cost, Planning, and How to Get Started

    If certain patches of your garden scorch every single year no matter what you plant there, it might be time to stop fighting the spot and work with it instead. A gravel garden is one of the most effective ways to turn a stubbornly dry, sun-baked area into a genuinely low-maintenance, good-looking feature — here’s what it actually involves.

    What is a gravel garden, exactly

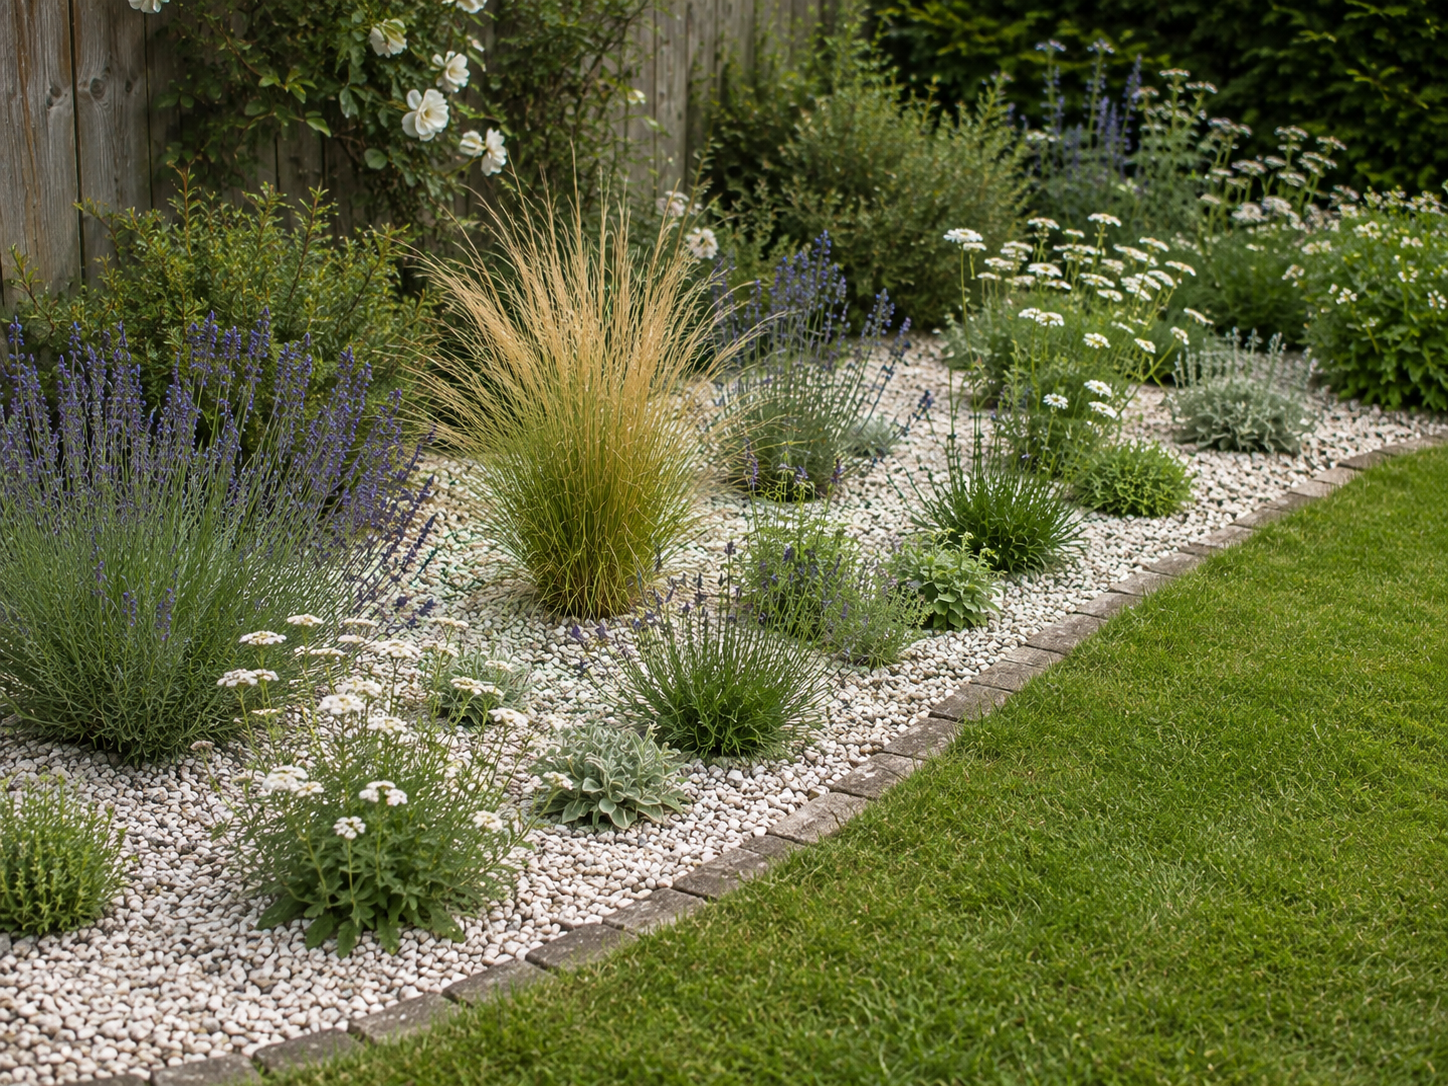
    A gravel garden replaces some or all of a lawn or border area with a layer of decorative gravel, usually planted through with drought-tolerant species. Rather than gravel simply covering bare ground, plants grow directly through it, roots reaching down into the soil below. The gravel itself helps suppress weeds, retains some soil moisture underneath, and reflects heat away from plant roots rather than trapping it.

    It’s a genuinely different approach to a “gravel path” or driveway — a well-planted gravel garden looks more like a naturalistic, Mediterranean-style border than a hard landscaping feature.

    Why it works so well for dry, sunny spots

    • No mowing, no reseeding, no scorched-lawn cycle every summer
    • Excellent drainage — ideal for plants that hate sitting in wet clay over winter, since the gravel keeps the crown of the plant clear of standing moisture
    • Reduces watering need dramatically once established, since gravel acts as a mulch layer holding moisture in the soil beneath
    • Suits exactly the conditions many gardens now struggle with — full sun, thin or poor soil, south-facing slopes

    Roughly what it costs

    Costs vary considerably by region, gravel type, and area size, but as a rough guide for a UK garden:

    • Gravel itself: typically £40–£80 per tonne depending on type (decorative gravels like Cotswold buff or slate chippings cost more than basic ballast); a tonne covers roughly 10–12 square metres at a standard 5cm depth
    • Membrane (weed suppressant fabric): £20–£40 for a medium-sized garden roll
    • Plants: highly variable, but budgeting £8–£15 per plant for decent-sized drought-tolerant perennials is reasonable; a modest area might need 15–25 plants
    • DIY versus hiring help: doing it yourself keeps costs to materials only; hiring a landscaper to prepare, lay, and plant a medium area typically adds several hundred pounds in labour, depending on your region and the complexity of the site

    For a modest 15–20 square metre area done as a DIY project, a realistic total budget is often somewhere in the £300–£600 range, mostly weighted toward plants rather than gravel itself.

    How to plan and build one

    1. Assess drainage first

    Gravel gardens work best on free-draining soil. If your soil is heavy clay that holds standing water for long periods after rain, you’ll need to improve drainage before starting — usually by digging in horticultural grit or coarse sand to a reasonable depth, particularly in the planting holes themselves.

    2. Clear the area

    Remove existing turf, weeds, and any old plants you don’t want to keep. Dig out perennial weed roots thoroughly, since they’re much harder to remove once gravel and membrane are down.

    3. Decide on membrane or no membrane

    A weed-suppressant membrane laid before the gravel significantly reduces weed growth long-term, but some gardeners prefer to skip it, since it can make it harder for self-seeding plants to spread naturally and can restrict deep-rooting plants slightly. For a lower-maintenance approach, membrane is generally worth it; for a more naturalistic, evolving planting style, some gardeners go without.

    4. Plant through the membrane (or straight into soil)

    Cut cross-shaped slits in the membrane where each plant goes, dig the planting hole through it, and plant as normal. Water in thoroughly regardless of the season.

    5. Lay the gravel

    Spread gravel to a depth of around 4–5cm across the whole area, working it gently around the base of each plant. Avoid piling gravel directly against plant stems, which can encourage rot.

    6. Water well for the first year

    Even drought-tolerant planting needs regular watering while establishing — don’t assume the gravel garden looks after itself from day one. By year two, most plants should need minimal supplementary watering.

    Plants that suit a gravel garden particularly well

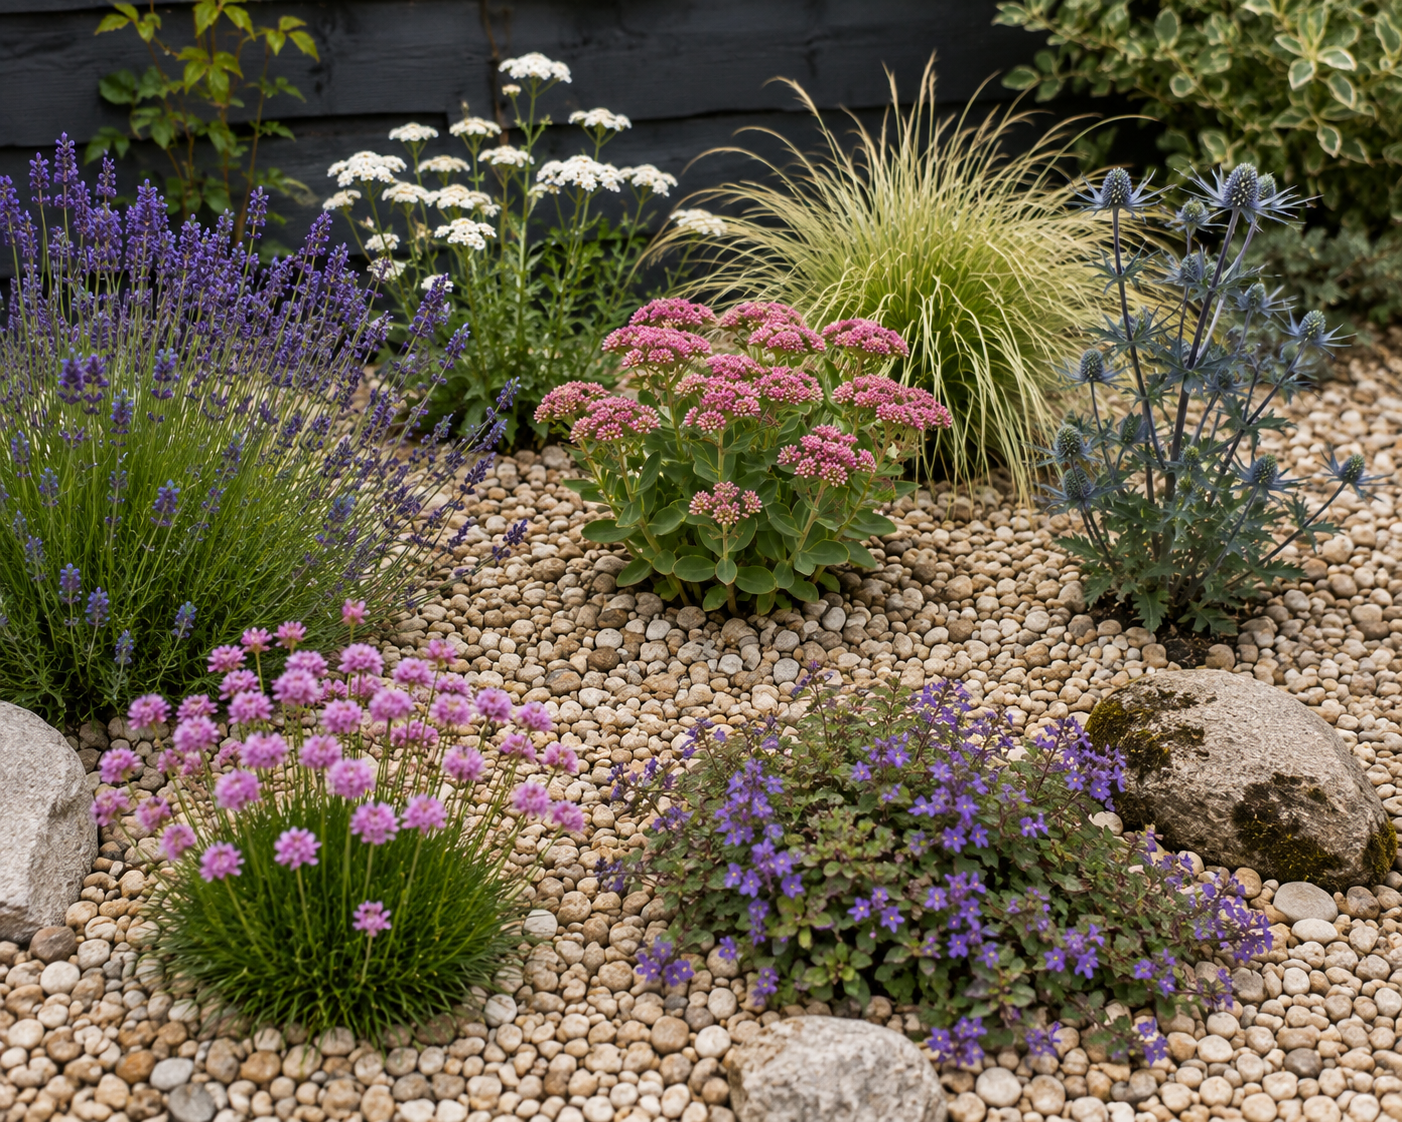
    Many of the plants covered in our drought-tolerant plants guide work brilliantly in gravel specifically — lavender, sedum, ornamental grasses, and sea holly all thrive in these free-draining, sun-baked conditions. Achillea and catmint also do well threading through gravel in a more relaxed, naturalistic style. For more on Mediterranean-style planting that thrives in similar free-draining conditions, also see our guide to Mediterranean planting for UK clay gardens.

    The bottom line

    A gravel garden isn’t a quick weekend project, but it’s a genuinely permanent solution to the areas of a garden that fight you every summer. Once established, it needs a fraction of the time, water, and money that repeatedly nursing a struggling lawn or border through each dry spell demands — and it tends to look better doing it.

  • Water Butt Buying Guide: Getting the Most From Rainwater in a UK Garden

    Water Butt Buying Guide: Getting the Most From Rainwater in a UK Garden

    With rain finally back after a long dry stretch, now is exactly the right time to start catching it. A water butt is one of the cheapest, lowest-effort changes you can make to how your garden copes with the next dry spell — here’s what actually matters when choosing one.

    Why bother with a water butt

    Free rainwater, collected while it’s falling, means you’re not relying entirely on mains water (or facing a hosepipe ban) when the next dry spell hits. Many plants also genuinely prefer rainwater to tap water, since it’s naturally soft and free of the chlorine and added minerals found in mains supply. And with UK summers trending hotter and drier, having stored water ready to go, rather than starting from empty, makes the next heatwave considerably less stressful to manage.

    What size do you actually need

    Water butts are usually sold in sizes from around 100 litres up to 300 litres or more, sometimes linked together for even greater capacity.

    • 100–150 litres suits a small garden, patio, or balcony with a handful of pots and containers
    • 210 litres is a solid middle-ground choice for an average UK garden with borders and a modest lawn
    • 350 litres or linked systems make sense for a larger garden, an allotment, or if you’re serious about reducing mains water use significantly

    As a rough guide: a single heavy downpour on an average UK roof can generate several hundred litres of runoff, so even a 200-litre butt fills faster than most people expect — it’s rarely a case of “too big.”

    Where to position it

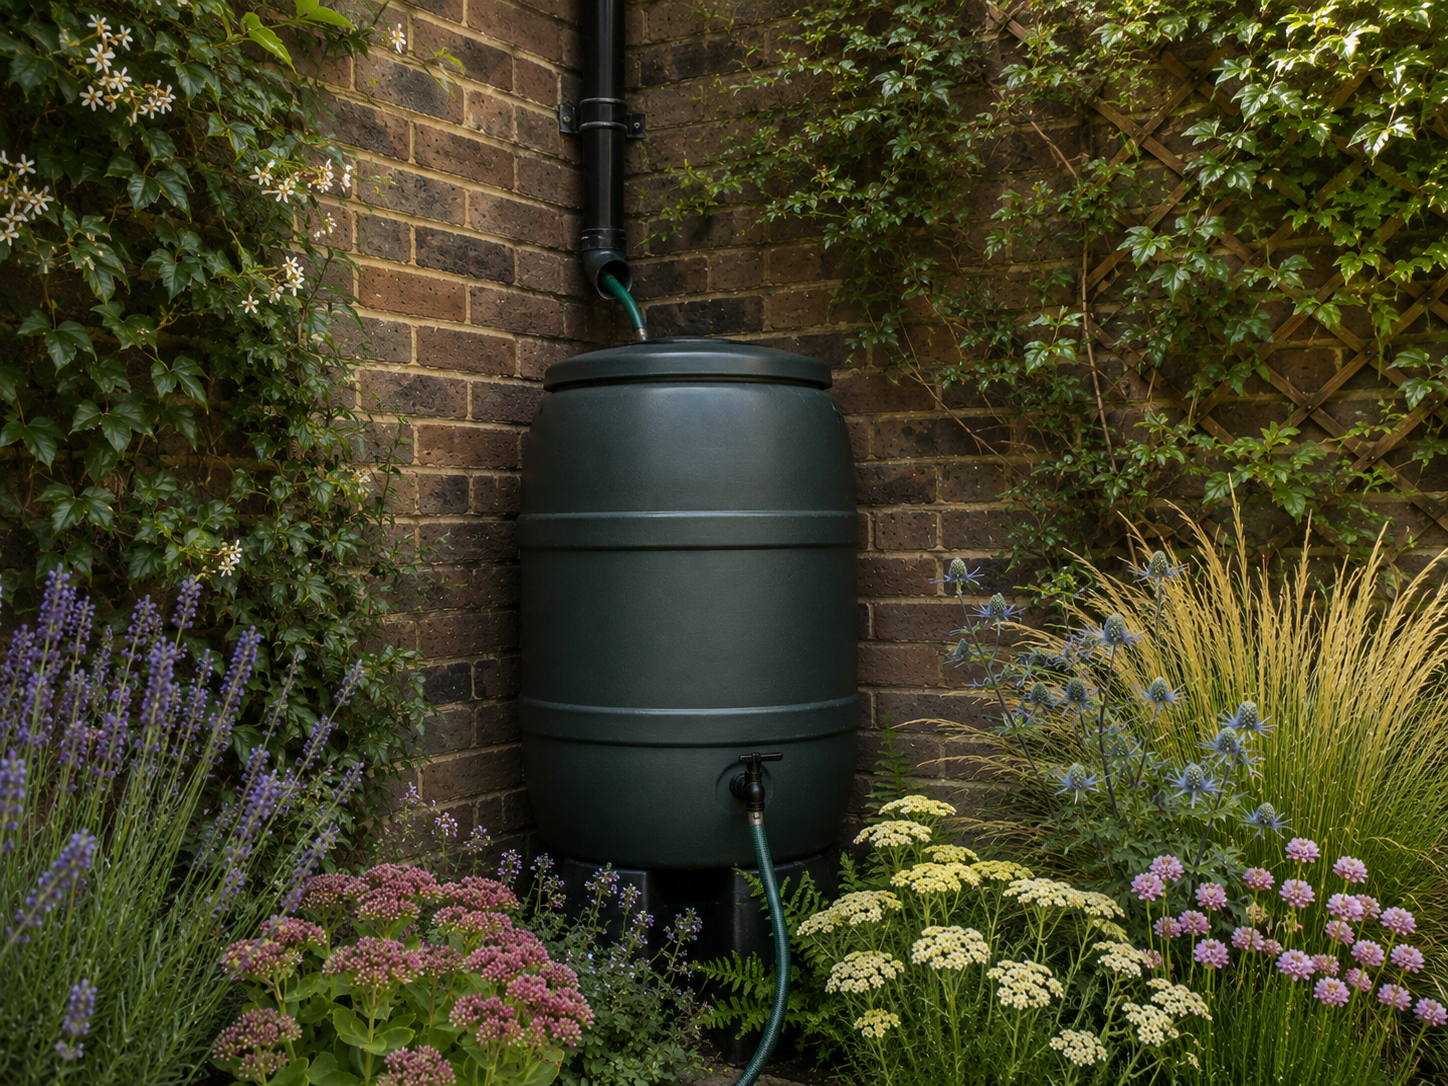
    • Directly under a downpipe from your house, garage, or shed roof — this is by far the easiest way to collect water without extra kit
    • On level, stable ground — a full water butt is extremely heavy (a 200-litre butt full of water weighs around 200kg), so it needs solid footing, ideally on a purpose-made stand or paving slabs
    • Close to where you’ll actually use the water — a butt tucked in an inaccessible corner tends to get used far less than one near your main borders or greenhouse

    What to look for when buying

    A proper diverter kit

    Most water butts either come with, or can be fitted with, a rainwater diverter that redirects water from your existing downpipe into the butt, and automatically overflows back into the downpipe once the butt is full. This is much less hassle than cutting and repositioning the downpipe itself.

    A tap positioned low enough for a watering can

    Sounds obvious, but some cheaper butts have taps positioned too high to fit a full watering can underneath comfortably. Check this before buying if you can.

    A lid or mesh cover

    Keeps debris, leaves, and mosquitoes out, and is a genuine safety consideration if you have young children or pets around the garden.

    Material and UV resistance

    Most water butts are plastic; look for ones described as UV-stabilised, since cheap, non-UV-treated plastic can become brittle and crack after a couple of summers in direct sun.

    Slimline and decorative options

    If space or appearance is a concern, slimline water butts (designed to sit flat against a wall) and decorative options styled to look like terracotta pots or wooden barrels are widely available, usually at a slightly higher price than a standard round butt. Worth considering if the butt will be somewhere visible, like a front garden or near a patio.

    Maintenance worth knowing about

    • Empty and rinse out annually, ideally in early spring, to clear out sediment and algae build-up before the main growing season
    • Check the diverter isn’t blocked after autumn leaf-fall, since blocked diverters are a common reason butts stop filling properly
    • Raise it on a stand if you haven’t already — even a modest stand makes filling a watering can from the tap far easier than crouching to a ground-level tap

    The bottom line

    A water butt is a small, one-off cost that pays for itself the first time you’re watering containers or new plants during a dry spell without touching the mains. With rain finally back, now is the ideal window to get one installed and positioned before it’s needed in earnest again next summer.